

Upload banking files
- Select the Transactions tab.
- Select Upload of files, from the left menu.
![]()
Upload banking files in Firefox, Chrome or Edge
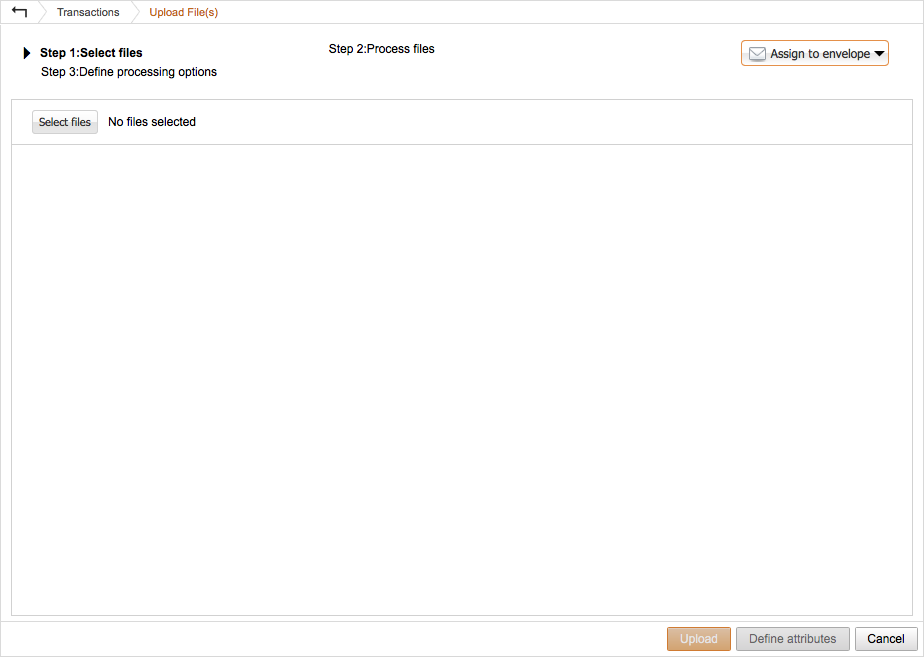
Step 1: Select files
- Click on the Select files-button.
- A Finder-style navigator will be shown. Use it to navigate to the folder where your bank files are located, then select the file(s) you want to upload and click on Choose.
You can select multiple files by holding down the <shift> key while selecting the files.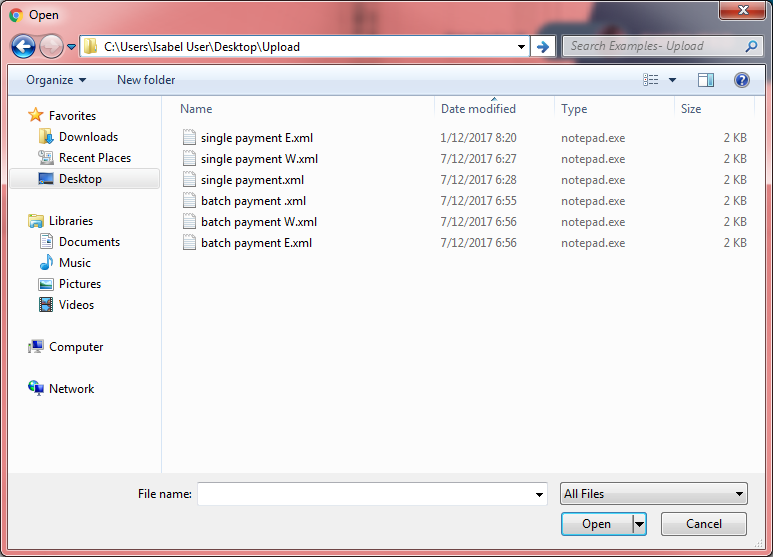
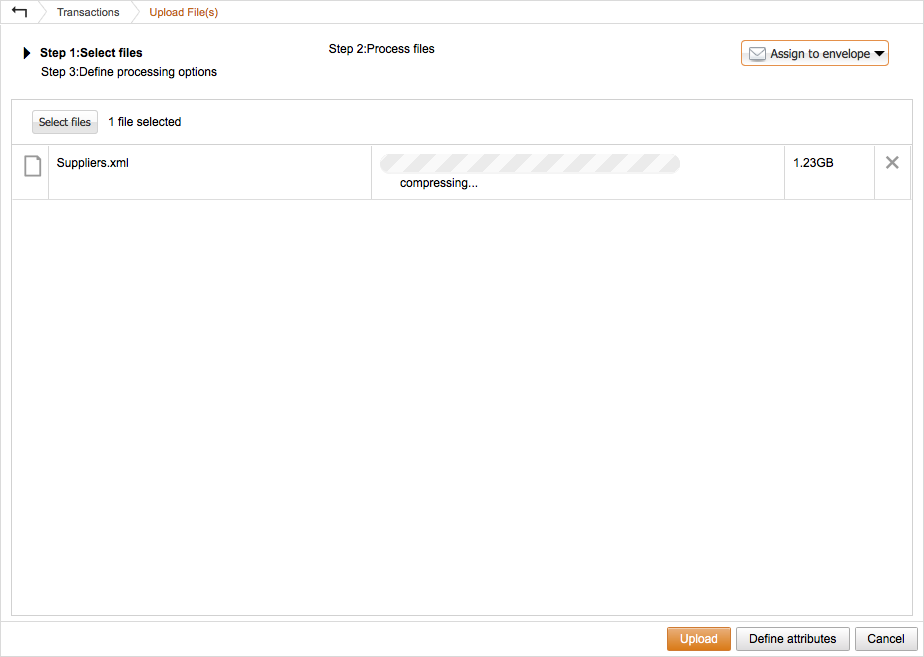
- The file(s) will now be compressed before proceeding with the upload process.
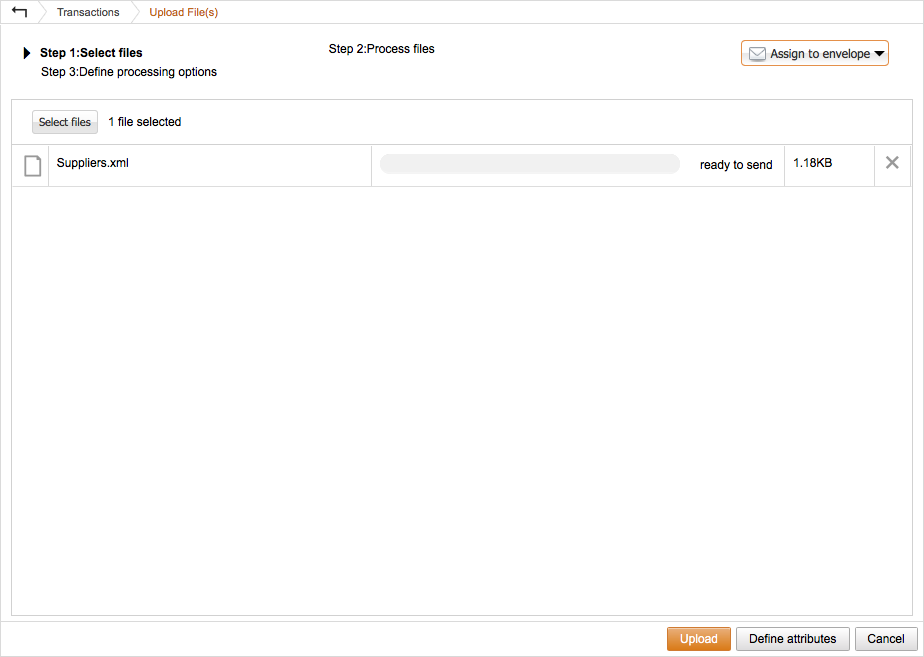
- Once the compression process is complete, you can proceed to immediately upload the file(s), or you can define attributes first.
The following attributes can be defined:
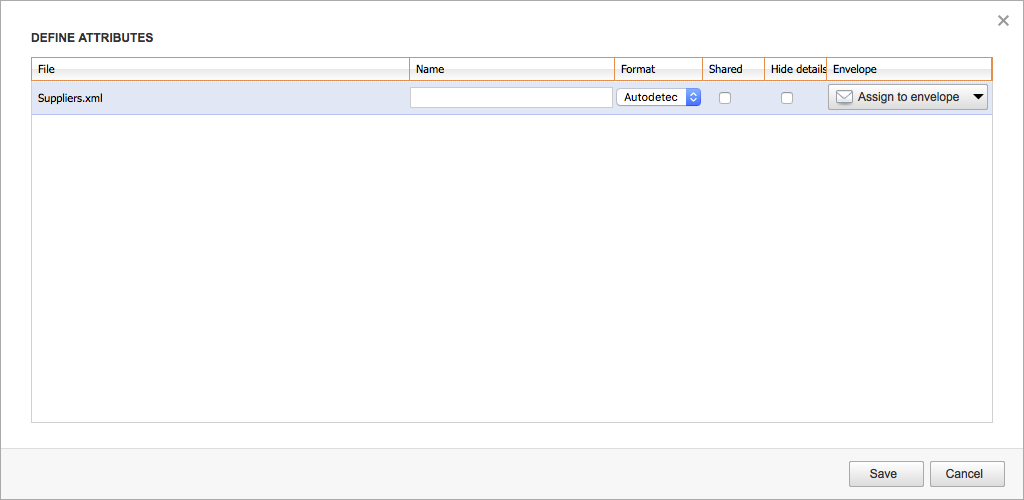
- Specify another name that will be displayed in transaction overview after uploading. By default the "Uploaded payment file: [Filename]" will be used.
- Specify the format of your file. By default Isabel will automatically detect the type of your banking file, it is therefore not required to modify this. In case your file is not a supported banking file, you will be required to specify the format and bank in Step 3: Upload files (if you are connected to a bank that supports this).
- Choose to select Shared in case everybody that is connect to the corresponding eBanking contract may view your upload file. By default only the potential signers and the uploader will be able to view the banking file.
- Specify the environment: Production means that the bank and Isabel will run all checks on the file. Afterwards the bank will execute the payment if these turn out ok and return feedback to the user. Test means that the bank and Isabel will run all checks on the file but that it will NEVER be executed by the bank although the user will receive feedback. If you want to know if a particular bank supports this function, it is best to contact them.
- Choose to select Hide details in case you want to hide the content of your file for anybody who has access to. Once hidden, only the uploader will be able to view the details.
Remarks:- In case you want to hide the details (use global debit) in account information, you must activate global debit while creating your file in your ERP or accounting software.
(In the file, the <BtchBookg> (Batch Booking) tag determines the level of detail of the account information subsequently sent by your bank.)
Consult the user manual of your ERP or accounting software for more information. - You cannot revert hide details.
- Selecting Hide details will be mentioned in the Audit trail.
- In case you want to hide the details (use global debit) in account information, you must activate global debit while creating your file in your ERP or accounting software.
- Assign your file to an envelope. You can also manage your envelopes from the Transactions.
After having defined the attributes, click on Save to confirm and proceed.
- The selected file(s) will now be uploaded. Leave the page open in your browser until the upload process is completed, otherwise the upload with be aborted.

Step 2: Process files
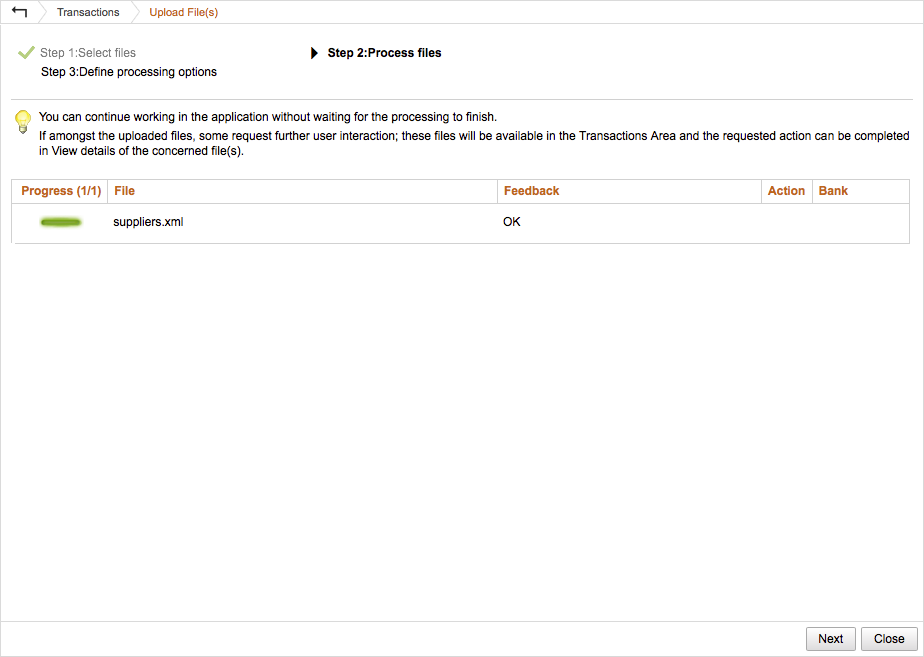
Once the upload process is complete, your files will be processed. This process might take some time depending on the amount of transactions and the complexity of the configured signing rights.
 : Currently processing the bank file.
 : The file has been processed successfully.
 : The file produced one or more errors. Please check the column feedback for more information (more information on common error messages).
 : The file produced one or more warnings, or is of an unknown type.
- In case your file contains warnings, check the column feedback for more information. You can accept or reject the warning from the column Action (more information on common warning messages).

- In case you are uploading a bank specific format (which is not in the list of supported file types), you will be able to select your bank and a type.
To be able to upload DIV files, you need to be subscribed to the module Upload cheque & various files.
- In case your file contains warnings, check the column feedback for more information. You can accept or reject the warning from the column Action (more information on common warning messages).
Step 3: Define processing options

- Sign immediately: specify if you want to sign the transaction when clicking Finish. No checkbox is available in case you are not allowed to sign the banking file.
- Send when sufficiently signed: specify if you want them to automatically be sent to the bank if all signers have signed the transaction. This option is only available if you are subscribed to the module MultiSign.
If you are uploading multiple banking files at the same time, clicking the column title "Sign immediately" and/or "Send when sufficiently signed" will check all the boxes at once.
- Invite signers: will show a pop-up where you can invite potential signers for the corresponding banking file. This option is only available if you are subscribed to the module MultiSign
Note: In the Preferences > Transactions you can automatically activate the options "Sign immediately" and "Send when sufficiently signed".
![]()
Upload banking files in Firefox, Chrome or Safari
Step 1: Select files
- Click on the Select files-button.
- A Finder-style navigator will be shown. Use it to navigate to the folder where your bank files are located, then select the file(s) you want to upload and click on Choose.
You can select multiple files by holding down the key while selecting the files with your mouse.
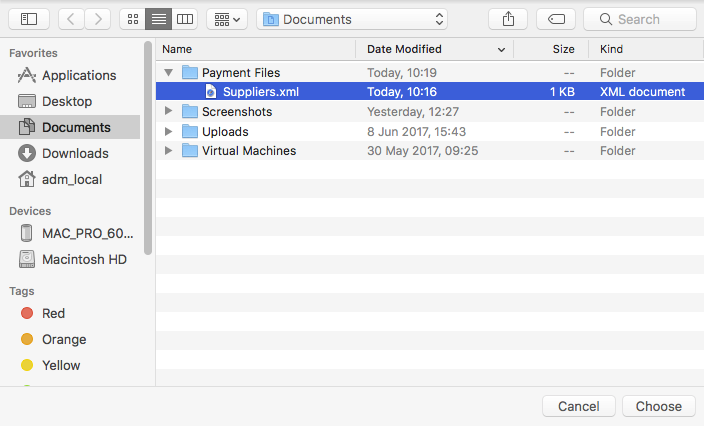
- The file(s) will now be compressed before proceeding with the upload process.
- Once the compression process is complete, you can proceed to immediately upload the file(s), or you can define attributes first.
The following attributes can be defined:
- Specify another name that will be displayed in transaction overview after uploading. By default the "Uploaded payment file: [Filename]" will be used.
- Specify the format of your file. By default Isabel will automatically detect the type of your banking file, it is therefore not required to modify this. In case your file is not a supported banking file, you will be required to specify the format and bank in Step 3: Upload files (if you are connected to a bank that supports this).
- Choose to select Shared in case everybody that is connect to the corresponding eBanking contract may view your upload file. By default only the potential signers and the uploader will be able to view the banking file.
- Specify the environment: Production means that the bank and Isabel will run all checks on the file. Afterwards the bank will execute the payment if these turn out ok and return feedback to the user. Test means that the bank and Isabel will run all checks on the file but that it will NEVER be executed by the bank although the user will receive feedback. If you want to know if a particular bank supports this function, it is best to contact them.
- Choose to select Hide details in case you want to hide the content of your file for anybody who has access to. Once hidden, only the uploader will be able to view the details.
Remarks:- In case you want to hide the details (use global debit) in account information, you must activate global debit while creating your file in your ERP or accounting software.
(In the file, the <BtchBookg> (Batch Booking) tag determines the level of detail of the account information subsequently sent by your bank.)
Consult the user manual of your ERP or accounting software for more information. - You cannot revert hide details.
- Selecting Hide details will be mentioned in the Audit trail.
- In case you want to hide the details (use global debit) in account information, you must activate global debit while creating your file in your ERP or accounting software.
- Assign your file to an envelope. You can also manage your envelopes from the Transactions.
After having defined the attributes, click on Save to confirm and proceed.
- The selected file(s) will now be uploaded. Leave the page open in your browser until the upload process is completed, otherwise the upload with be aborted.
Step 2: Process files
Once the upload process is complete, your files will be processed. This process might take some time depending on the amount of transactions and the complexity of the configured signing rights.
- : Currently processing the bank file.
- : The file has been processed successfully.
- : The file produced one or more errors. Please check the column feedback for more information (more information on common error messages).
- : The file produced one or more warnings, or is of an unknown type.
- In case your file contains warnings, check the column feedback for more information. You can accept or reject the warning from the column Action (more information on common warning messages).
- In case you are uploading a bank specific format (which is not in the list of supported file types), you will be able to select your bank and a type.
To be able to upload DIV files, you need to be subscribed to the module Upload cheque & various files.
- In case your file contains warnings, check the column feedback for more information. You can accept or reject the warning from the column Action (more information on common warning messages).
Step 3: Define processing options
- Sign immediately: specify if you want to sign the transaction when clicking Finish. No checkbox is available in case you are not allowed to sign the banking file.
- Send when sufficiently signed: specify if you want them to automatically be sent to the bank if all signers have signed the transaction. This option is only available if you are subscribed to the module MultiSign.
If you are uploading multiple banking files at the same time, clicking the column title "Sign immediately" and/or "Send when sufficiently signed" will check all the boxes at once.
- Invite signers: will show a pop-up where you can invite potential signers for the corresponding banking file. This option is only available if you are subscribed to the module MultiSign
Note: In the Preferences > Transactions you can automatically activate the options "Sign immediately" and "Send when sufficiently signed".
More Information
Supported banking file formats and their corresponding specifications
An error message is displayed when uploading a banking file
Verify the integrity of an uploaded file
When a banking file is uploaded, Isabel 6 calculates a unique hash on it. During the signature process, the content and integrity of the file is guaranteed by this hash. You can ask your IT department to calculate this hash to compare it with the hash displayed in the detail screen an on the signature screen. This way you can assure the file you are signing is exactly the one that you created in your accounting package.
I don't know the path of the folder where my files are located (Windows)
- Locate your file using Windows Explorer (the file manager).
- Right click on your banking file and choose Properties.
- In the properties, the path will be displayed (see Location).
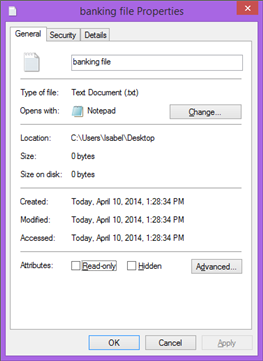
- Once you know the path, you can proceed with Step 1 as outlined above.
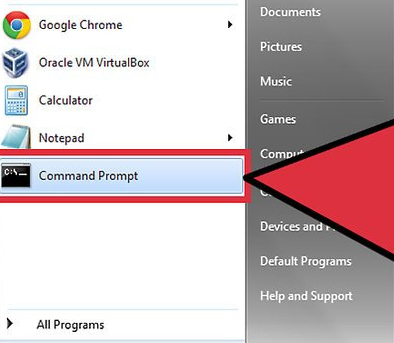
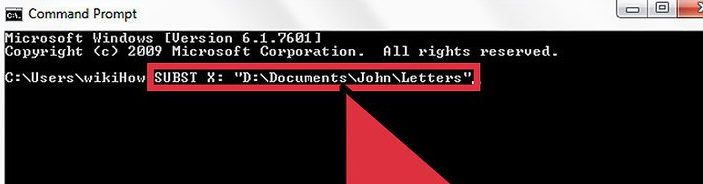
Add a drive letter to the local folder for easy access
- Open the command prompt window as default user.
- Use the SUBST command to map your folder to a drive letter. For example: SUBST X: "D:\Documents\John\Letter"
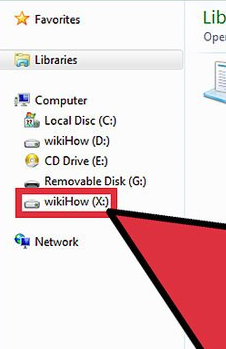
- Open 'Windows Explorer'. You should see a newly created drive letter X: with which you can access your mapped folder directly.
- Create a file in notepad and put SUBST X: "your folder" in the file
- Click 'Save as':
- File name: 'filename.cmd'
- Save as type: 'All types (*.*)'
- Run the file after the reboot by double click
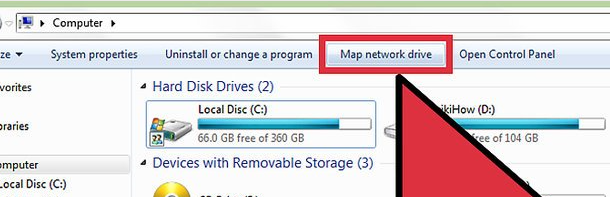
Add a drive letter to a network folder
- Open 'My computer'

- Click Map Network Drive from the Tools menu
- Select a drive letter that you want to assign to the mapped folder in the drive

- Type the server and share name of the folder you want or click browse to find the folder
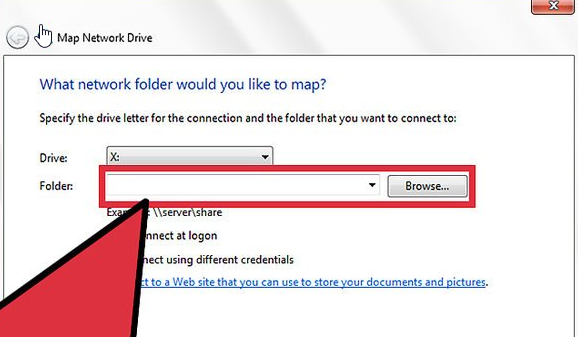
- Click Finish